Pages

Wednesday, 28 September 2016

Transfer files between iOS devices using Zapya

Zapya is the latest file sharing application developed by Dew Mobile Inc and can be downloaded from Google Play store and from the App store for iDevices. Zapya can be used to transfer any kind of files between various different platforms. The speed of transfer reaches up to more than 200 times that of bluetooth. The best part of Zapya is that you do not need any sort of internet connection to transfer files which means you get to share files and save money on it as well.


Share files without any limit so you do not need to trim any of your files before transferring them. Nor do you need any cables and wires to transfer files now. In this blog I will be giving you a step by step tutorial on how to use Zapya to transfer files between iPhones. To read more on Zapya click here.

How to share files within iOS devices using Zapya?

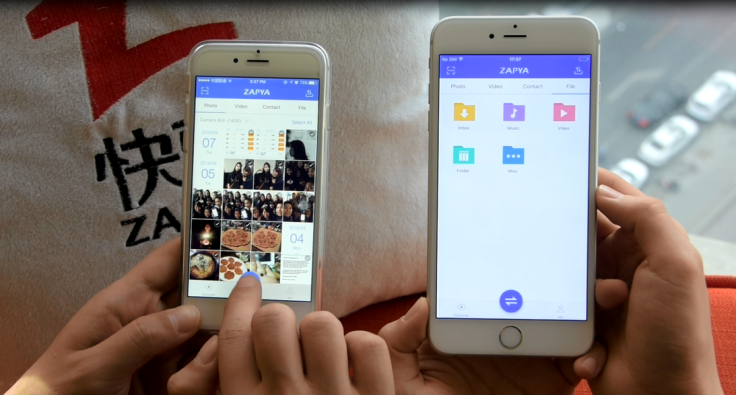
Step One - Make sure you have downloaded the latest Zapya from the App store. The latest version is V 4.4.0 and can downloaded on devices having iOS 7.0 upwards. Also make sure the device that you want to share the file to also has the latest Zapya downloaded on it.

Step Two - Launch the Zapya application and tap on to the Connect button. It is placed at the bottom of the screen. When you tap on Connect it will start looking for devices nearby.


Step Three - The application will show you a list of devices nearby after scanning. You need to select the device that you want to share with.


Step Four - Once you have connected with the iDevice that you want to share with, now it is time to select the content you want to share. And then press Send. The Send button is also placed at the bottom of the screen and is blue in color.

Wednesday, 21 September 2016

HOW TO BROWSE INTERNET AT HIGH SPEED 600 Mbps OR MORE

 HOW TO BROWSE  INTERNET AT HIGH SPEED 600 Mbps or MORE

                                                                                                                                                                                                                                                                                                                                                                                                                 Internet has become a essential thing in human life.We cannot think of a life without internet.But if the internet speed is slow then ??
people usually have have internet speed of 1 or 2 Mbps or more than that still the video will be buffering a lot mainly on youtube and other websites.

you can get 600 Mbps or more faster internet by using a website called www.rabb.it (rabbit)

Rabb.it

It is remote desktop with a browser.you can do anything with it .
The best part of the website is that you can browse the internet faster .
Can also watch  videos on youtube,Netflix etc 


ESSENTIALS

A PC or a laptop
A internet connection (any speed but stable connection)
Need a Rabb.it account(you can create account for free)


TO GET FASTER INTERNET-PROCEDURE


Complete the procedure that is Given Below

 GO TO THE WEBSITE Rabb.it(www.rabb.it)

now create a rabb.it account

 you can sign up for Rabb.it using your facebook account  also
they will send you an email confirm your account by just clicking the link that you received on your email account
after logging in you will get a screen saying that "How do you want to Rabbit?Take your pick"
click messages only 


After that  you will get a screen just click Decide what to watch


After that a screen will pop up in which you can select you favorite sites and you can also type url of the website which you want to browse 
this is the best way to browse internet faster 

DOWNLOADING IN Rabb.it

The limitation of Rabb.it is that you can not directly download anything to your pc or laptop.
but you can download files and then upload it to cloud services like Google Drive etc 
you can also check many amazing feature of Rabb.it  like video chatting etc

 If any doubt leave a comment.If you like this blog and still want more like me on facebook and follow me on Google +


Thursday, 15 September 2016

Install ADB on your Android

ADB also known as the Android Debug Bridge is a set of utilities that come with the Android SDK of Google. Using the ADB you can do various things with your device connected to your PC with a USB cable. You can copy files and manage them, install applications or uninstall applications, run commands on your device and a lot more. Things like backing up and restoring your Android smart phone or tablet requires you to have ADB drivers installed.


In this tutorial I will be telling you how you can install ADB on your Android. To read more on ADB Drivers for Android click here.

First, you need the Android SDK from Google

Go to the Android Studio download page and download just the command line tools. You will find this at the bottom of the page. These tools consist of the ADB drivers as well. Download the compressed file and extract and save the file wherever you want.

Second, you run the EXE file

You will see a window like the one shown below. You need to un check everything on the list except Android SDK Platform Tools.
In case you own a Google Nexus Smart Phone then you might as well check the Google USB Driver as well to install the latest drivers for your device. Install that. Close the window once its done.


Third, you need to enable USB debugging

To do this, go to Settings ==> About Phone ==> Tap on Build no 7 times
This will enable Developer Options on your device. Go to Developer Options and Enable USB Debugging.


Finally, You can test your ADB drivers.

Open the folder where you extracted the SDK Tools into. There will be a sub folder in that called Platform tools. Open it. Then hold the shift button and right click together on the white are in the folder. Click on Open Command window here.


Connect your device with the PC and run this command.
"adb devices"
You should see the following window with your device in the list.


Note - If your device is connected but you do not see it in the list you will have to install the latest USB drivers for your device on your PC.

Wednesday, 14 September 2016

How to Use Phone as a Portable Hotspot(share internet with others via phone).

         
                         Dosto ajj kal har ghar mai smartphone use ho rahy hain aur smartphone mai sub sy zaida common name ANDROID hai. Iss name sy tw aap sub achi tarah waqif hon gy. Baaz dafa yeh hota hai k ghar mai aik mobile pr Internet Package available hota hai pr baki phones pr nahi hota tw is ka hal mai aaj apko btaon ga k kiesy 1 phone ka internet baki phones py use kiya jaye. Ye bohat simple hai aur mai apko step by step bataon ga Inshallah apko samajh aa jaye gi.


           Tw waqt zaya kiye beghair mai apko btata hn k apny krna kya hai. Apko krna yeh hai k jis phone pr intenet available hai usko use krna hai.

1. Sub sy pehly apny us phone ki Settings open krni hain.

2. Phr Wireless And Network mai ja kr More Settings ko select krna hai.

3. Usky bad aapny Tethering And Portable Hotspot py click krna hai.

4. Yahan apko sub sy opper Portable Hotspot ka option nazar aayega us py click krien.

5. Yahan aap apni device ko Configure krien means k apny Wifi Hotspot ki settings krien.

6. Ab Portable Hotspot option ko check kr dien.


      Friends yeh sub kuch krny k bad ab ap jis dosry phone py internet use krna chahty hain unka Wifi ON kr dien aur Wifi enjoy krien aur Comment and Share krna mat bholean